I have been running a blog series called Inventors of Tomorrow. Each post includes a full array of activities for a 2 hour STE(A)M enrichment class for children age 3 – 6. I am moving all those posts over to a separate blog: http://inventorsoftomorrow.com/.
You will still find posts on STEM topics and outdoor education on this blog: just click on “STEM activities” or “nature activities” on the right hand side bar. (On a mobile device, scroll to the bottom of the page.)
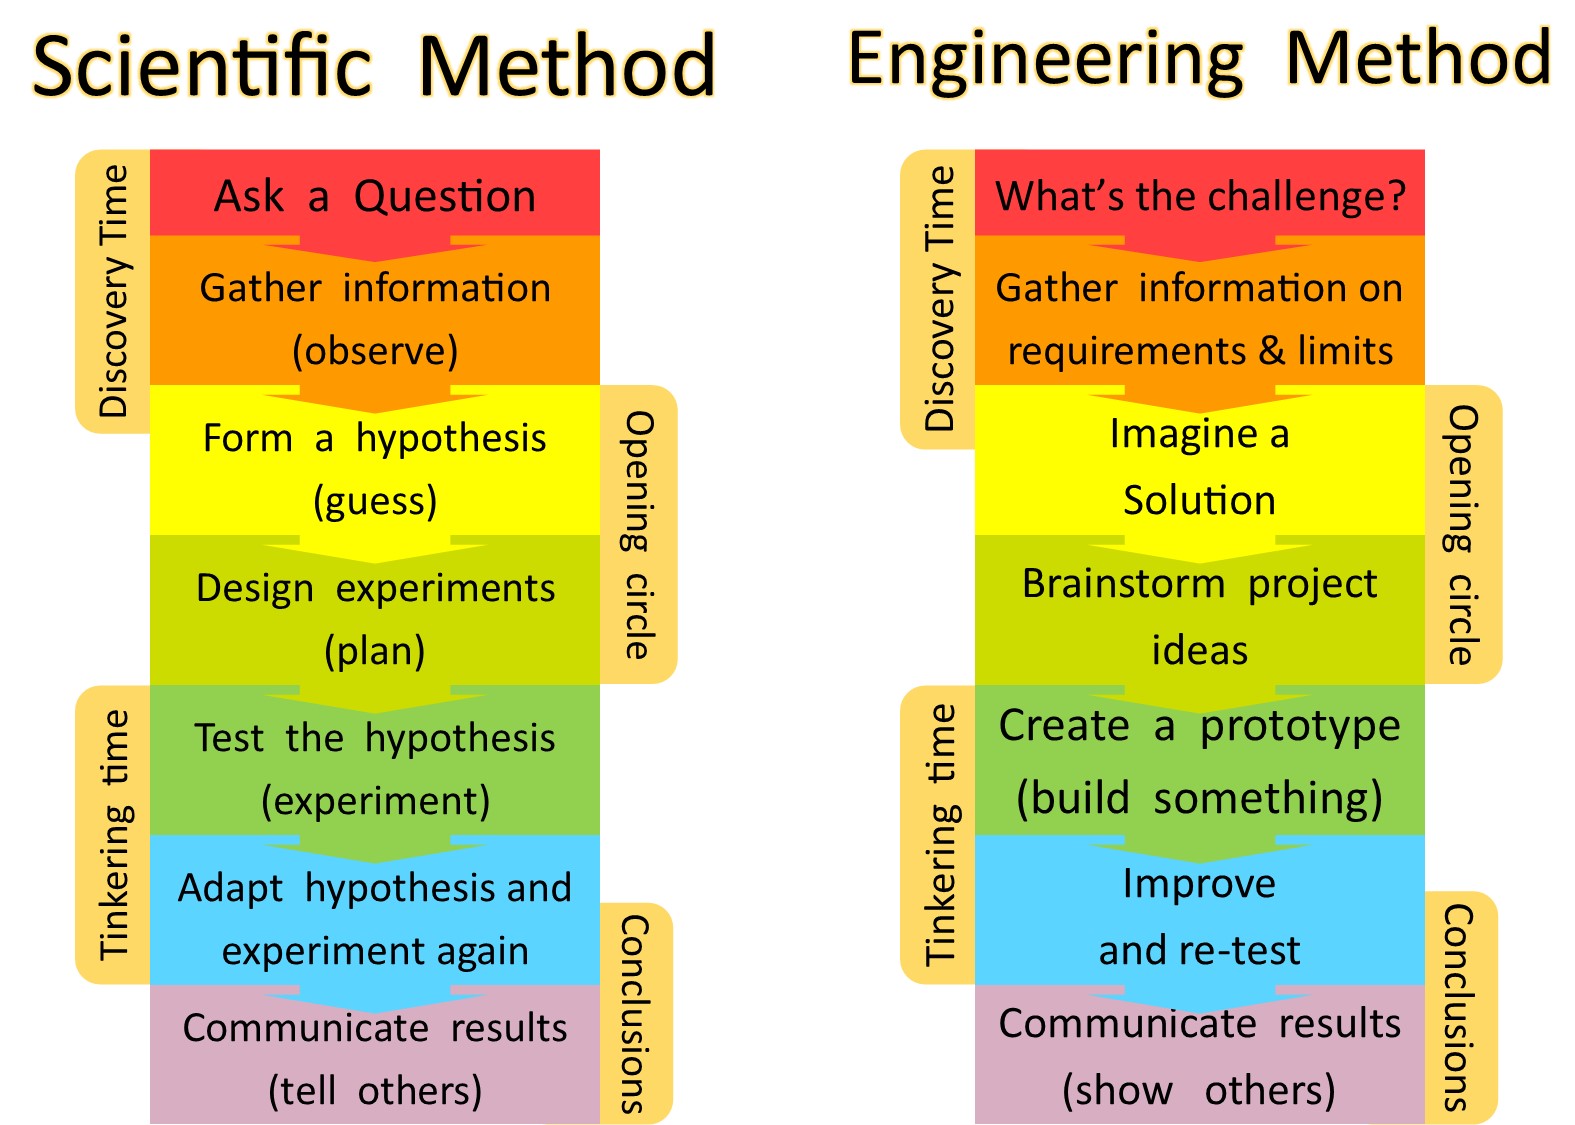
We have designed the flow of the class so we begin with letting the children explore and discover on their own, making their own connections, and discovering their own questions before we give them any answers. After that, we talk about some big ideas, then send them to play with those ideas some more, then re-gather to share their conclusions. The maps above show the relation of this class structure to the scientific method and to an engineering process. Let’s look in more detail about how this works.
Set-Up: Before class, the teachers have set up a variety of hands-on activities related to the theme. They always include: building projects, toys for free exploration, art projects, some big motor activity, a sensory table and/or a water table, and books on the concept. (Just click on the “Inventors of Tomorrow” category in the right hand sidebar, and you’ll find plenty of examples of activities we have done on various themes.)
Discovery Time: The first twenty minutes is “discovery time.” We let the kids explore freely, trying things out hands-on, noticing patterns, and making their own connections and interpretations before we present the concepts of the day. Some children come in with a lot of prior knowledge on the day’s topic (like our resident paleontology fans on dinosaur day!) and quickly build on that knowledge. Others come in with virtually previous exposure to a concept, and are really creating connections from scratch. They are “gathering information.”
Opening Circle: We then have an opening circle with all the kids combined (up to 24 kids, ages 2.5 to 7). We ask them to share what they’ve seen, we ask a few children to share what they have made. (During discovery time, the teachers watch for kids who are creating really good projects to illustrate some concepts – they ask those children if they will show their work during opening circle.) We ask them what they think the theme is and how the activities connect to it. After we’ve first grounded in what they’ve discovered, we introduce the key concepts of the day, and talk about the other activities we’re doing. Sometimes we’ll give them a challenge to work on during tinkering time.
Tinkering Time: They return to the activities with fresh information and interpretation, and have 30 more minutes to explore more, tinker more, and test out ideas.
Teachers encourage kids to test ideas, then adapt them a little, then test them again, to learn more about the topic. We also ask questions which extend learning.
Outside Time: Our Rockets (older kids, age 4 to 7) go outside. We often have more ideas related to the theme that they can explore outside. But this is also a little time to just run off some steam, so they come back in better able to relax and attend to opening circle. (Learn about the mood and concentration benefits of outside time here.) [The Robots – age 2.5 to 4 have closing circle first, then outside time.]
Conclusions Circle: In closing circle, we talk again about: what did you observe, what did you build, what did you test, what did you learn? We do more activities related to the theme, often including a book on the topic to wrap up the day’s concept.
A few days after class, parents receive an email, which often has follow-up activities they can do at home, or pointers to this blog to learn about activity ideas we had but weren’t able to fit into class time or logistics.
We find that beginning with hands-on discovery raises the children’s engagement. Kids are naturally curious, but this format specifically harnesses that curiosity as a learning tool. They arrive to the opening circle open and ready to learn more. If we started by “teaching” them, they wouldn’t learn as much.
I am beginning a new series, called Inventors of Tomorrow, which will feature science, engineering, and nature-related activities for preschool / early elementary age children. [NOTE: In January 2016, I moved all the Inventors of Tomorrow posts over to a new site: www.InventorsOfTomorrow.com]
I teach a class called Family Inventors’ Lab, which focuses on hands-on learning and exploration of ideas from science, nature, engineering, and art. It is a multi-age class for kids age 2.5 – 7. The focus is on tinkering: making things, testing them, re-building them, and testing again, and learning in the process. We have a new theme each week, but they are clustered into units that last 2 – 6 weeks. The Inventors of Tomorrow series shares the activities we do in class: art, science exploration, imaginary play, and more.
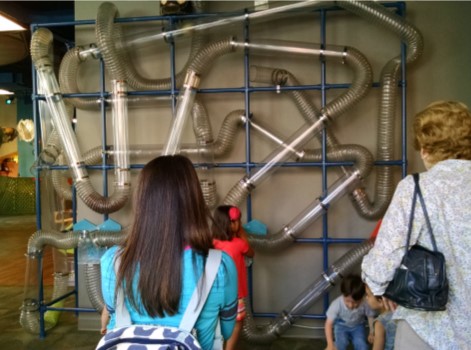
We’ve travelled to many children’s museums around the country, and our sons favorite exhibits are always the ones where fans or pneumatic tube systems shoot balls or scarves through tubes, like the “scarf poof” at Kidsquest, the Air-mazing Laboratory at Imagine in Everett, and this one at the Tacoma children’s museum:
We started with the fan. Exploratorium mentioned that they had made a wind tube using a squirrel cage fan. I researched those, but they need wiring skills I don’t have. So, we chose a utility fan, specifically the Lasko Blower. (You could probably use a regular fan, but it wouldn’t create nearly as strong a wind.) This video shows what the fan does with a scarf on its lowest setting – all the other videos have the fan on the highest setting. (In class, I started the kids with just the fan and some scarves to blow up into the air, and even that simple game elicited gleeful giggles.)
We bought a ten-foot long flexible ventilation hose The challenge was: how do we connect this round hose to the oblong opening on the fan?
We built a couple of boxes from cardboard and cut door flaps in them where you can push a scarf in. [Note: you can find a pattern for these boxes in a more recent post on my other blog.] These were more fun for kids, because it focuses the air, so scarves shoot a little higher.
And check out what happens when we sent a little plastic “bowling ball” through the door.
We mounted a poster tube through the box. You could stuff scarves into a tube, hold your hand over one end, then let go, and they’d shoot into the air. You could shoot a lightweight ball too – like a cannon ball.
Then it was time to figure out how to attach the hose to the box. We tried taping the hose to the box but that didn’t work. So, I bought a hose connector for the end of the hose, figuring we could attach that more easily.
Then we assembled it. Put the cardboard box over the fan, mounted the hose on the box, and we were good to go. When I tested this at home, with just one child, it worked great. We had a fabulous time with it, shooting scarves into the air, shooting balls so they rolled across the floor for the dog to chase, shooting balls into a box for improvised “golf” game. Tons of fun for both of us.
But, then my husband tested it in a class full of kids. The first problem was that it kept falling apart. The fan tilts in its base, and if you tilt it too far, it pushes the cardboard box right off. (I may have forgotten to warn my husband about this issue… ) When kids put their hands in and pulled them out quickly, that pulled the cardboard box off quickly. Just the weight of the hose could pull the box off. So, there was a lot of work involved in just keeping it together, and the kids weren’t that excited by the results even when it worked.
So, before the next time we’d use it in class, we did some tinkering. We used a ratchet strap to hold the hose onto the box and the box onto the fan. We turned it so the hose fed off the other side of the fan, over the handle, which helped to stabilize the box. This solved the falling apart problem.
We had discovered that kids like it better when the scarves shoot vertically up into the air instead of shooting out horizontally, so we wove the hose through the legs of a stool to get that upward angle.
Check out the video at the top of this post to see the scarf cannon in action.
We took it back to class, and this time, we had a hit on our hands! Lots of kids loved feeding through scarves, and balls.. We discovered that kids liked it even better when we set the stool up on top of the cubbies, so the scarves were shooting out from 4′ up in the air. The three biggest fans of this toy were a team of a 5 year old boy and a 4 year old boy, and a 2.3 year old girl. They discovered that if you sent through a balloon that was just the right size, it makes a really funny rumbly noise. The little girl was just as successful at using this invention as the older kids. She clearly learned from them. The boys had been having fun catching the scarves in a bin as they floated down toward the ground. When they walked away for awhile, she picked up the bin and tried to catch the scarves.
My next step is to try to re-create this thing we saw at a bounce house place… it was a batting cage, where a ball floated above a cone and the kids could hit it with a nerf bat. Right now, with a 4″ wide stream of air, my scarf cannon holds the ball right above the tube outlet. But I’m thinking if I got a traffic cone type shape that really focused the air, we might get enough lift to do this…
In our Inventors class, we are encouraging kids to tinker, and try things they’ve never done before. We tell them to build something, test it, re-build it, and so on. I am intentionally doing the same thing as I design activities for the class. Experimenting, failing, and trying again. This scarf cannon is still a work in progress, but it’s definitely a fun exploration!
Since I wrote this post in 2015, we’ve updated our design. To find the most recent design and see more videos of our scarf cannon in action, check out this post on my other blog (Inventors of Tomorrow) about Fun with a Fan.
In Bellingham, WA, there’s a fascinating place called Mindport.
It’s a little like an art gallery full of beautifully crafted exhibits… but unlike art galleries, you get to touch and interact with everything! It’s a little like a children’s museum where children are welcomed and can explore and play with everything… but the exhibits are intriguing enough that all the adults in the room were as engaged as the kids. It’s like a science museum with exhibits that illustrate scientific concepts – and binders that explain the details… but it’s prettier, and somehow more soothing and meditative, than any science museum I’ve been in.
Here’s how their website defines what they are:
MINDPORT (mind port) n.: 1. a museum of phenomena; 2.) a provocative blend of art and interactive exhibits; 3.) a place to spark your awareness and stimulate your thinking; 4.) a place to play and to observe.
Before going to Mindport, I read a review that said “everything about them is amazing… except their website.” I have to agree. The website only includes brief descriptions of a few of the exhibits, and a brief description of “what are we” is buried way down in the blog archives. Not enough to give you a good sense of what to expect. So, I’m going to give some detailed descriptions here of the experience and some of the exhibits, then offer a few more photos as “teasers” of what else you’ll discover here.
The Location
Mindport is in downtown Bellingham, WA. It’s in a retail storefront space, about the size of two typical stores, so not huge. Admission is only $2. There are lots of restaurants and other museums within walking distance. It was fairly busy for the first hour or two we were there (on July 3), but never crowded and never loud. By the end of our time there (mid-afternoon), we were the only family, and had some nice chats with a very friendly and helpful docent, and our son got to play the pipe organ, which they ask that only skilled musicians play when it’s crowded, as you can hear it throughout the museum.
The Exhibits
The first exhibit we came to (#1 in the photos above) was the deep sea divers. Pump a hand bulb and plastic divers descend down the tube toward you. Stop pumping, and they pop back up to the surface. Our four year old had a hard time pumping effectively, but a 6 year old did great. They both liked seeing the divers come down.
They had a ball wall (#2). As people who frequent children’s museums and science museums across the country, we are connoisseurs of ball walls, also known as marble runs. (For ideas on how to build your own, check out my post here.) I really liked this peg board system, and all the different sizes of tracks available (notice the rack to the left with all the tracks organized and ready to use.) It was very adjustable and we found lots of fun ways to build it then re-engineer it. (Which is why I love ball walls. I think they’re a fabulous way to teach your child the engineering method: build something – test it – adjust it so it works – test it – adjust it again to make it even better – test it again. Read my post here on how willingness to fail and try again is a key to success.) Only downside – they only had three marbles. I understand not having too many, because then kids don’t chase them down when they escape the ball run and other people step on them. But 5 would be nice so me and a couple kids could play at the same time.
The Aerotrack (#3) allows you to put a ball in a pneumatic tube, then air shoots it along a track and returns it to you. You can choose three tracks. One is very short and very fast. One takes the ball all the way up to ceiling height, then around several loops before returning it to you. My engineering-minded husband enjoyed figuring out where the switching point was and how it changed which track it went on. (I won’t tell you – we’ll leave that as an exercise for the reader.) This was one of our son’s favorite exhibits. The museum was small enough and mellow enough that we were able to leave him here playing while we explored other exhibits nearby, which I appreciated. (Unlike other times where I’ve been stuck at a ball wall or other exhibit for an hour while he played and I read Facebook on my phone… I mean, I like playing with him at an exhibit and all… but this boy has a LONG attention span and a greater joy in repetition than I apparently have…)
#4 is the Diabalique, a table that you tilt side to side to run balls through a maze. Read a short article on it here, or watch the “Making of” video.
#5 is “Burl Ives”, a piece of burl wood that when you rock it gently from side to side, it plays musical tones. So hard to explain – I wish I’d made a video, but very intriguing to play with, probably even more so for a very musically oriented person.
#6 and 7 are the Pneumatic Ping Pong. The majority of the exhibits have signs that explain how they work and binders that talk about either the design process or the scientific principles. The sign on this one says “Note: we only added instructions here because a visitor asked why there weren’t any. Please feel free to pretend there still aren’t. 1. Press the on button. 2. Play.” Here’s a brief video:
Playing with lightweight objects floating on air currents is just an on-going source of fun for kids (and yes, for me). We’ve built a wind tube (see more here), and what I call a “scarf poof” – like all those exhibits at children’s museums where you feed a scarf into a tube, and the air shoots it through and out the other end. (Some day I’ll write a blog post on how we built this…. it’s still a work in progress in our tinkering process.) And now this pneumatic ping pong is on my list of possible future projects…
This next video shows an exhibit with 100 compasses mounted on a lazy susan with a magnet suspended above… watch how the compass needles respond to the magnet:
This video shows a marble elevator. You turn the crank and the marbles go uphill, then roll down ramps. Like so many other exhibits, this and the compass exhibit show the melding between beautiful art – their woodworking is fabulous – and interactive experience.
But wait… there’s more.
They do have plenty of art on the walls, like GIANT TASKS / tiny people, which are quite nice. I’m a very kinesthetic, non-visual person, so I confess that I spent more time with the hands-on interactive items.
The joy of this place is when you see something and think: “that doesn’t look like much of anything”, your next thought is “hmmm…. maybe I should interact with it and see what it does.” On the left below, you’ll see a table that’s perfectly lovely, but a bit dull. But then when you spin it, you see wave patterns form inside it – see middle photo – you can click on the photos to see them full screen. (On their blog, Swirl is “a stand-alone sculpture featuring rheoscopic fluid under glass, [which] evokes air and ocean currents.”)
There’s also a picture with colored glass tiles in it, which again is lovely enough, but a little dull. But the video shows what happens when you wave a hand in front of it.
Here’s some more photos of other exhibits to inspire you to travel up to learn what they do! (Click on the pictures to see a full screen version.)
Learn more:
There are more details about some of their exhibits in their blog archives: http://mindportexhibits.blogspot.com/, which also include some interesting long articles on the nature of things like science education (STEAHM… putting the Arts and Humanities into STEP education) and insights into the training and mindset of a tinkerer / inventor / maker: director Kevin Jones.
I enjoyed the place so much, I wanted to give them more money on the way out, but they didn’t have a donations box. When I got home, I looked at their website for a “donate here” button, but they didn’t have one. I did find a note in their blog archives that they are not a registered non-profit. But I would still be happy to contribute more to their work, and would suggest that they offer an easy opportunity to pay more than $2. I don’t know how many people would do it, but there’s probably other “crazy” people like me who would.
The trip to Bellingham
Overall, it’s a nice day-trip from the Seattle area. It’s well worth the 80 minute drive we did from Kirkland. It’s not an “all day” activity. Our family spent a little over two hours there and were actively engaged the whole time, but had explored it all by the end of that time. But since it’s so cheap, even if you just dropped by for an hour, there’s plenty more to explore in downtown Bellingham. I’d recommend it for children and adults, and particularly for students of my Family Inventors class. (Note: it’s great for age 4 on up. 3 year olds would likely do OK, but probably not worth a road trip if you have a toddler)
MIndport doesn’t open till noon on Fridays (and isn’t open at all on Mondays and Tuesdays, FYI), so we had a lunch beforehand at Mount Bakery a block away. The brie, apple, and pear crepe was fabulous, and they had great service. Our waitress saw that our son was really hungry, and brought his food out early, but held it up high where he couldn’t see and mouthed to us: “OK to give this to him now?” I appreciated having the chance to give the idea a thumbs up.
After Mindport, we stopped by the Comics Place, across the street, and picked up a comic book for our son to read in the car on the way home. There’s also lots of used book stores nearby, if you prefer.
On our next road trip to Bellingham, we look forward to a quiet morning exploring the FIG (Family Interactive Gallery) at Whatcom Museum, then a loud and exciting afternoon at the MegaZapper electrical show at the Spark Museum of Electrical Invention – only held on Saturdays and Sundays. (We LOVE the Theater of Electricity at the Boston Museum of Science.) We also plan to return to Mindport someday – I want to play with the ball wall some more!