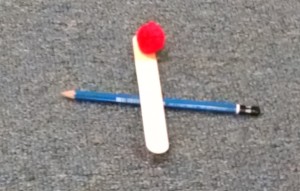
Catapults are a huge hit with kids… being able to launch things into the air and across the room is always exciting!
There are LOTS of ideas online for how to build catapults. I want to present a simple series of catapults that show the evolution of an idea.
Supplies needed: pencil, popsicle / craft sticks, rubber bands, a plastic spoon, an object to launch (e.g. pompom or mini marshmallow or coins)
Stage 1
First, take a popsicle stick (the bar of your lever), balance it over a pencil (your fulcrum). Put an object (your load) onto the end that’s laying on the table. Hit the high end of the stick, the object launches. This is an easy depiction of the simple machine concept of levers (learn more about Levers here.)
You can also play with this idea – use a bigger fulcrum – use a longer lever. Like try a large spoon balanced over a rolling pin, or a ruler balanced over a marker.
Kids will have plenty of fun with this. Launching things is fun. But, they’ll soon discover that this is a weak catapult – we can get a lot better launch by evolving it.
Stage 2
Now, take two popsicle sticks: Use a rubber band to fasten them together at one end. Then slide a pencil (or three craft sticks bundled together) between the sticks until it pushes up against the rubber band. Set it down. Put your pompon (or coin) on the raised end, then use your finger to press down and release. The pom pom will fly much higher!
If the coin / pompom keeps sliding off the end of the bar, you can glue a lid to the end of the bar so you have a “bucket” to put your coin / pompom into.
Stage 3
After they’ve had a good time with this one, you can take this simple design to the next level by creating a spoon catapult. You’ve already got your two popsicle sticks banded together. Use a rubber band to attach a plastic spoon on one. (Here’s a picture from www.devincollier.com/how-to-build-a-simple-small-marshmallow-catapult/. to show you where to fasten it.)
Slide your pencil in between the sticks, as before (or use two or three popsicle sticks rubber-banded together). Now launch items from the spoon – your launch arm is longer, and you added the springiness of the spoon – does this increase the strength of the launch (i.e. does your object travel farther?)
Stage 4
Now bundle together 5 craft sticks to use as your fulcrum – this is what is shown in the picture above, and you can also find directions at http://cosmos.bgsu.edu/STEMinPark/takeHomeActivites/2012/MarshmallowCatapult.pdf
Is the catapult stronger with a taller fulcrum and more pressure on the rubber bands that bind the launch sticks together? What if you use 8 sticks in your bundled fulcrum?
Stage 5
Use longer bars to build the catapult than popsicle sticks. Maybe rulers? Rubber band them together at one end, and keep using your bundle of craft sticks as a fulcrum.
Continue to experiment… Here’s a very similar catapult built from a couple of wooden yardsticks, a piece of cork (used as fulcrum to separate the two sticks – you could use your stack of popsicle sticks) and some tape (could use rubber bands).
Testing and Tweaking
As you build a variety of catapults, test them. You can compare on two criteria: which designs launch the object the farthest and which launch it the most accurately (i.e. can you hit a target with it.)
For more STEM related activities, click on the word STEM in the right sidebar…


Pingback: Levers | Inventors of Tomorrow
Pingback: Our Ten Favorite Activities | Inventors of Tomorrow
Pingback: Levers | Inventors of Tomorrow
Pingback: Contraptions | Inventors of Tomorrow
Pingback: Force – Science for Kindergarten | Inventors of Tomorrow
Pingback: DIY STEM Summer Camp. Ages 3 – 6 – Inventors of Tomorrow
Pingback: What is an Engineer? – Inventors of Tomorrow
Pingback: What is an Inventor? – Inventors of Tomorrow
Pingback: Bugs – Entomology at Home – Inventors of Tomorrow
Pingback: Projectiles – What Goes Up… – Inventors of Tomorrow
Pingback: Launch a Pompom – Inventors of Tomorrow
Pingback: Levers – Simple Machines for Kids – Inventors of Tomorrow