Today I stumbled across a series of books called “Just for You!” They are 24 early readers for kindergarten to second grade, all written and illustrated by African-American authors and artists and featuring African-American children, often in urban settings.
I have only read one, which I really liked. (Lights Out by Medearis and Tadgell) Great illustrations, nice rhyme and rhythm to the text, a loving daddy, and a mischievous girl who sneaks out of bed to look at the city lights and make shadow puppets on the wall. So many children’s books feature Caucasian kids in pastoral settings, and the chance for an urban African-American child to see themselves represented in a sweet bedtime book is rare and, I’m sure, appreciated.
The book also includes a note to parents at the beginning about ways to read to your child: take a “picture walk” through the book, point out words as you read, and ask questions. At the end, there are suggested activities related to the story: making up a bedtime rhyme, looking out your own window and describing what you see and hear, making your own shadow hand puppets, and other things to talk about.
The Amazon reviews of other books in the series say they’re a little hit and miss in quality, so you may want to pick and choose from the best of them.
Here’s the full listing of all the books in the series. You can look up details and reviews on Amazon, and get them from your favorite online bookseller or your local library.
I teach a Family Inventor’s Lab, a STEAM enrichment class for ages 2.5 – 7. However, this class structure could work for any play-based preschool / early elementary classroom.
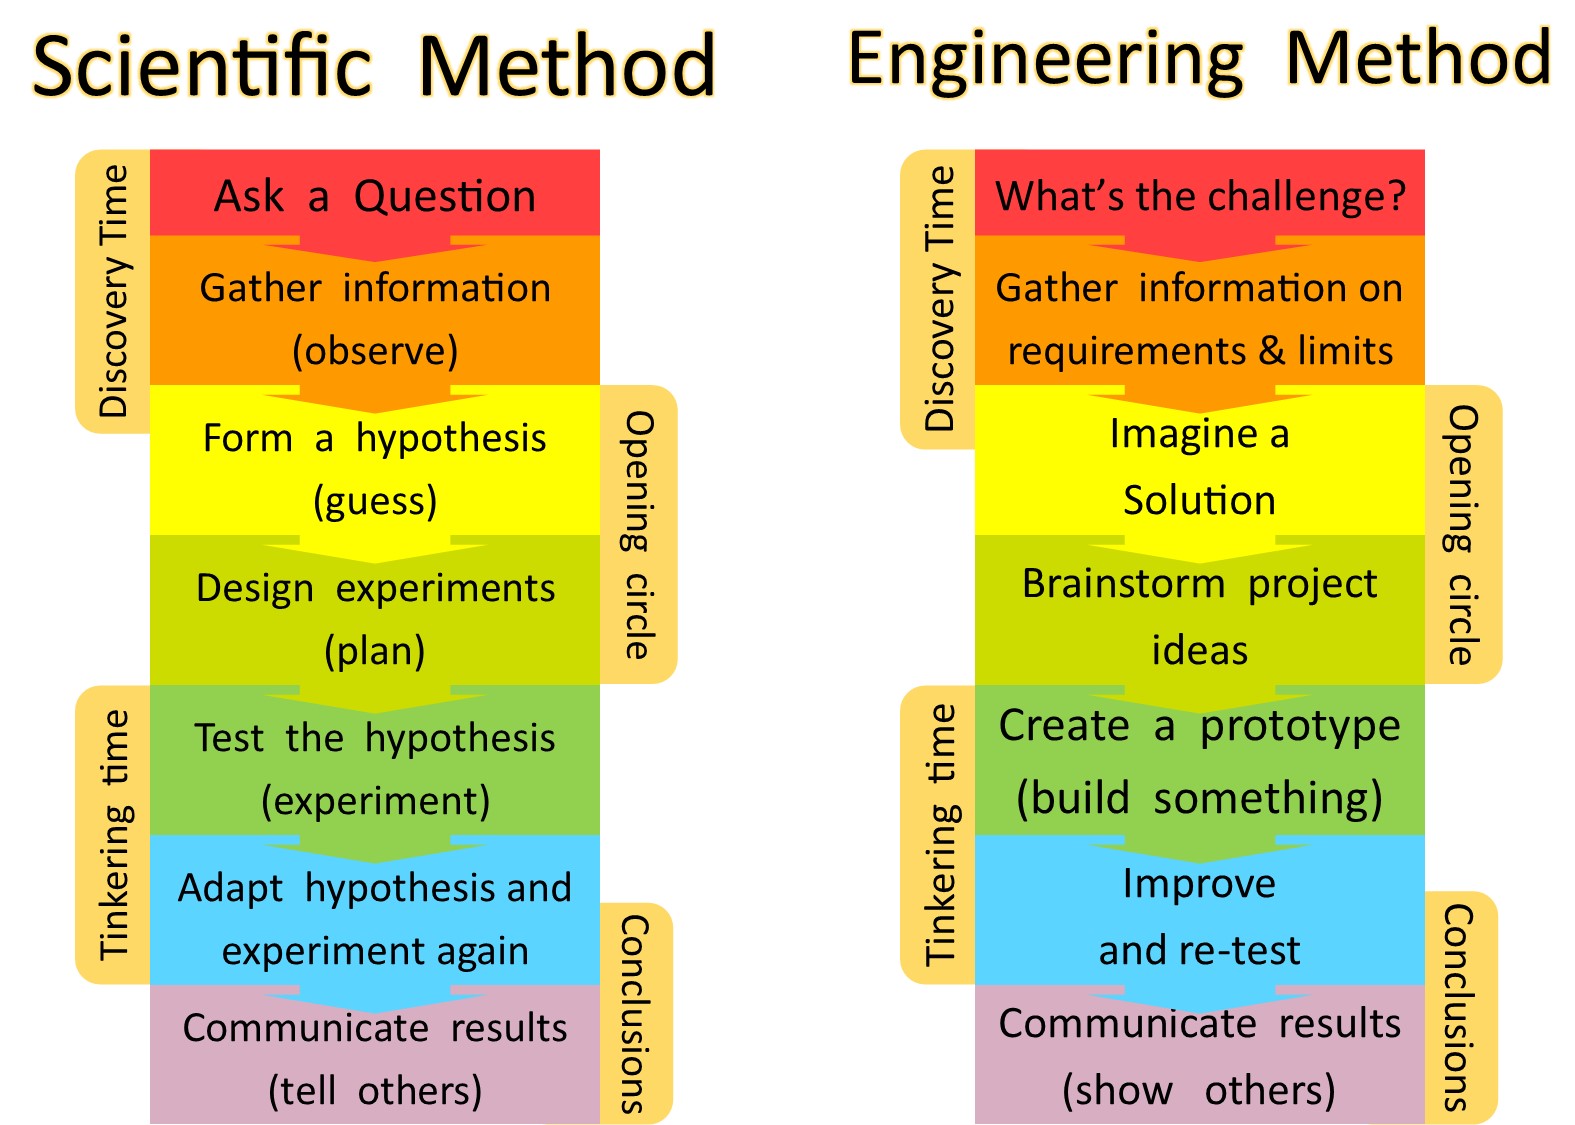
We have designed the flow of the class so we begin with letting the children explore and discover on their own, making their own connections, and discovering their own questions before we give them any answers. After that, we talk about some big ideas, then send them to play with those ideas some more, then re-gather to share their conclusions. The maps above show the relation of this class structure to the scientific method and to an engineering process. Let’s look in more detail about how this works.
Set-Up: Before class, the teachers have set up a variety of hands-on activities related to the theme. They always include: building projects, toys for free exploration, art projects, some big motor activity, a sensory table and/or a water table, and books on the concept.
Discovery Time: The first twenty minutes is “discovery time.” We let the kids explore freely, trying things out hands-on, noticing patterns, and making their own connections and interpretations before we present the concepts of the day. Some children come in with a lot of prior knowledge on the day’s topic (like our resident paleontology fans on dinosaur day!) and quickly build on that knowledge. Others come in with virtually previous exposure to a concept, and are really creating connections from scratch. They are “gathering information.”
Opening Circle: We then have an opening circle with all the kids combined (up to 24 kids, ages 2.5 to 7). We ask them to share what they’ve seen and done. We ask them what they think the theme is and how the activities connect to it. After we’ve first grounded in what they’ve discovered, we introduce the key concepts of the day, and talk about the other activities we’re doing. Sometimes we’ll give them a challenge to work on during tinkering time.
Tinkering Time: They return to the activities with fresh information and interpretation, and have 30 more minutes to explore more, tinker more, and test out ideas.
Teachers encourage kids to test ideas, then adapt them a little, then test them again, to learn more about the topic. We also ask questions which extend learning.
Outside Time: We have fifteen minutes on the playground. We often have more ideas related to the theme that they can explore outside. But this is also a little time to just run off some steam, so they come back in better able to relax and attend to opening circle. (Learn about the mood and concentration benefits of outside time here.)
Conclusions Circle: In closing circle, we talk again about: what did you observe, what did you build, what did you test, what did you learn? We do more activities related to the theme, often including a book on the topic to wrap up the day’s concept.
A few days after class, parents receive an email, which often has follow-up activities they can do at home, or pointers to this blog to learn about activity ideas we had but weren’t able to fit into class time or logistics.
We find that beginning with hands-on discovery raises the children’s engagement. Kids are naturally curious, but this format specifically harnesses that curiosity as a learning tool. They arrive to the opening circle open and ready to learn more. If we started by “teaching” them, they wouldn’t learn as much.
I created a new set of posters for the classroom on “Questions to Ask to Extend Learning.”
Educators frequently encourage parents and teachers to ask “open ended questions” as part of a facilitated learning process. But it may be hard for parents and teachers to think of good questions as they’re playing with a child in a classroom or at home.
Often, they end up asking yes / no questions, or quizzing kids for “the right answer.”
On Teacher Tom’s blog, he writes: “They say there’s no such thing as a stupid question, but I beg to differ. We hear stupid questions almost every time adults and young children are together. Here’s [an] example: a child is playing with marbles, exploring gravity, motion and momentum. An adult picks up a handful of marbles and asks, “How many marbles do I have?” The adult already knows the answer. The child probably does as well… [These] questions take a child who is engaged in testing her world, which is her proper role, and turns her into a test taker, forced to answer other people’s questions rather than pursue the answers to her own.”
So, I designed these posters to hang around the classroom to inspire parents with some good open-ended questions. They offer ideas of what to ask that will take the child’s learning to a new level. Click here for a PDF file and you can print your own.
You may hear early childhood educators say “Focus on Process more than Product.” Let’s explore what they mean by process and product, and some concrete tips on how to stay focused on the process.
In product-focused activities, the teacher or parent has a finished product in mind and has created a sample for children to copy, children have instructions to follow and all the children’s finished products look similar to each other. The closer the result is to the displayed sample, the more the adult will tend to praise the child for doing it well.
There is definitely a place for product-focused activities, and learning how to follow directions to create something specific. This can be an excellent way to learn certain skills. But, if children only follows directions, it can limit their creativity and limit their learning. It can also create stress if they feel like they have to do things ‘the right way.’
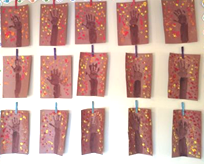
The three pictures below show paintings made using a flower as a paint brush. The lovely picture on the left is from here. The others are from 3 year olds in my class. All we did was set out paper, paint, and flowers, and the kids in our class had a fabulous time exploring this art experience. But imagine if we had set the painting of the flowers in a vase on the table at the start of class. How would that have affected the kid’s process and product?)
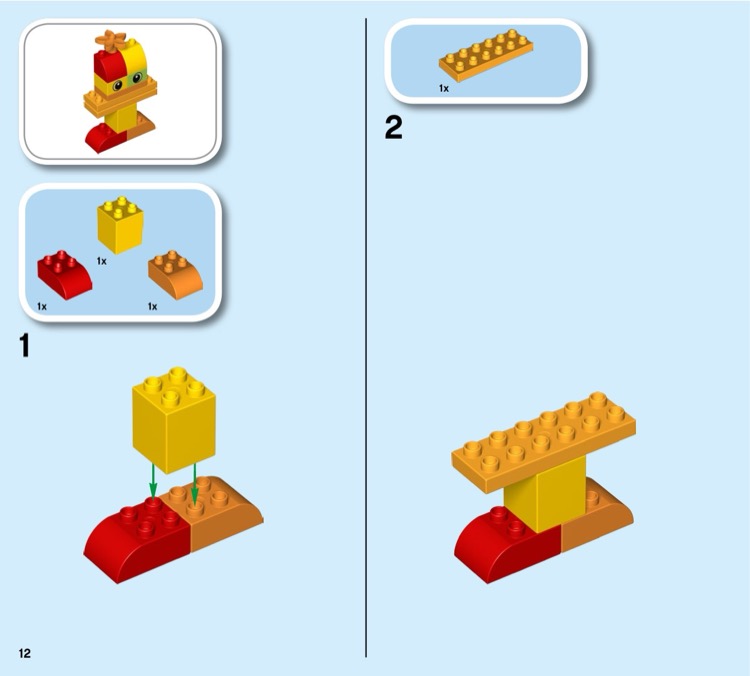
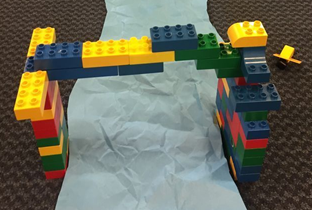
So, we want a balance of product and process in our child’s lives. For example, if your child gets a Lego set and follows the directions precisely to create the model as designed, they learn about paying close attention to directions, doing things in the right order, and not leaving out any steps. They are satisfied with their result. But then, you can encourage them to take that Lego set apart when they’re ready, and mix it with their other Legos, and play as long as they want, and build anything they want to build, they might use skills learned to build a bridge over “water”. This spontaneous building to meet a play goal is the process-focused side of Legos.
In process-focused activities, the focus is on experience, and exploration of tools and techniques. It is completely child-guided, with no right or wrong way of exploring. Children decide whether or not to do the activity, and how much time to spend on it. Examples in our classroom include: the water table, sensory table, block building, easel painting, “creation station” collages, and collaborative group art projects. We also do lots of explorations of scientific ideas and engineering projects which we think of as “tinkering.” These process-based activities do not lead to beautiful masterpieces to hang on the refrigerator or mail to grandparents. But they do lead to lots of fun and lots of learning.
Ways that you can support the Process:
When planning an activity, instead of asking “what will the children make”, ask “what will the children do?” and “what materials can I put out that invite creativity and learning?” If your child asks “what am I supposed to do?” you can say “I see lots of cool supplies and tools on this table. Want to try them out? What would you like to do with them?”
Approach the project like open-ended play. Let it be a joyful experience.
Provide plenty of uninterrupted time for kids to explore. Let them decide how long to spend on an activity. Some days you’ll put out an “invitation to play” and it will captivate them for hours. Other days, they’ll have other ideas of their own to pursue and barely skim past something that you planned.
Let go of your own judgments. Process-focused art and building projects can seem messy and pointless. Don’t think of them as a waste of materials, think of the brain cells your child is building through this experience and the skills they’ll learn now and apply to later efforts!
If you’re sitting with a child who is doing art or building something, try to copy what they are doing. Otherwise, they will try to copy you, and think that the way you’re doing it is the “right” way. They may be disappointed when their item is not as good as yours.
Or, if you’re playing side by side with them, make some mistakes: paint with your non-dominant hand, or build a tower too tall so it falls over. Let them see you explore.
Don’t ask them “what is it” – ask “tell me about what you’ve done.”
Don’t distract them with irrelevant questions. If they’re completely engaged in a process, don’t interrupt it with a name-this-color quiz.
Don’t decide for them that they are done. Often adults watch for when there’s a “nice” painting, and then offer to take the paper away before the child “messes it up.” Or they watch a child building and realize that it’s all about to come tumbling down, so they encourage the child to stop and not add that toppling brick on the top.
Ask them if they want to write their name on their art. If they say yes, then ask “would you like me to write it or do you want to?” If they want you to write it, ask where to write it. Ask them where they want to put it. On the refrigerator or in the recycling bin? Try to not be disappointed in their choices of what to keep and what to let go of.
As your child gets older, more and more of their time will be dedicated to products – book reports, math tests, science fair presentations, scoring goals at soccer, and more. Lots of time “doing things the right way.”
The early years should focus much more on process. All of a baby’s play time is process and free exploration. A toddler’s life should be about 90% process, 10% focused on specific accomplishments – learning to undress themselves, learning to eat with a fork, holding a pencil and making a scribble, stacking a few blocks to make a tower. In the preschool years, we may aim for 80% process, 20% product. Never think of the process as a less valuable learning experience. It’s building creativity, inspiring curiosity, helping them make unexpected connections, and getting them excited about what they can do ‘all by themselves.’