(I don’t sing the Ten Little Indians song, but it’s tune is the basis of many songs!
(C) 1 little, 2 little, 3 little snowflakes (G) 4 little, 5 little, 6 little snowflakes (C) 7 little, 8 little, 9 little snowflakes (G) 10 snowflakes on the (C) ground
(C) 1 little, 2 little, 3 little bubbles… in the sky
(C) Lift one foot and then the other, (G) Lift one foot and then the other (C) Lift one foot and then the other, (G) Lift them both to(C)gether.
(C) Where oh where are (baby’s) fingers? (G) Where oh where are ________ toes? (C) Where is _______ belly button? (G or G7) Round and round it (C) goes! (C) Where oh where are _______ ears? (G) Where oh where is _______ nose? (C) Where is _______ belly button? (G or G7) Round and round it (C) goes!
Open / Shut Them
(C) Open (G) shut them, (C) open (G) shut them, (C) give a little (G) clap clap clap. (C) Open (G) shut them, (C) open (G) shut them. ( ) Lay them in your (C) lap lap lap. ( ) Creep them (G) crawl them, (C) creep them (G) crawl them (C) Right up to your (G) chin chin chin (C) Open up your (G) little mouth, But ( ) do not let them (C) in!
Ring Around the Rosie Tune
(C) Ring around the rosie, A ( ) pocket full of posies, ( ) Ashes, ashes, We (G) all fall (C) down! ( ) Cows are in the meadow, ( ) Eating buttercups. ( ) Thunder! Lightning! We (G) all stand (C) up!
(C) Walk around the circle, ( ) all around the circle. ( ) Walking, walking, let’s (G) all do (C) this: [stop and do an action, like jump – they copy]
(F) Are you sleeping, () are you sleeping? (C7) Brother (F) John? (C7)Brother (F) John? (C7)Morning bells are (F) ringing, (C7) Morning bells are (F) ringing. (C7) Ding ding (F) dong, (C7) ding ding (F) dong.
(F) Skip skip skip to my lou (C7) Skip skip skip to my lou (F) Skip skip skip to my lou (C7) Skip to my lou my (F) darling
Next video:
(F) Here we go round the () mulberry bush (C7) Mulberry bush, () mulberry bush (F) Here we go round the ()mulberry bush (C7) So early in the (F) morning.
The (F) more we get together, to(C7)gether, to(F)gether, the () more we get together, the (C7)happier we’ll (F) be! (‘cause) (C7)your friends are (F)my friends and (C7)my friends are your (F)friends. The () more we get together, the (C7)happier we’ll (F)be!
Next video:
(F) It’s time to say goodbye. [echo] (F) To all of our friends. [echo] We’ll (C7) see you all (F) another day. [echo] When we (C7) all come back to (F) play. [echo]
(F) You put your hand in, () You put your hand out, () You put your hand in And you (C7) shake it all about. () You do the hokey pokey As you () turn yourself around () That’s what it’s all (F) about!
(F) Five little ducks went (C7) out one day, () over the hills and (F) far away. () Mama Duck said quack, (C7) quack, quack, quack. () But only four little ducks came (F) back.
Once you’ve mastered these, you can learn G chord, and then play C and G songs.
To play this chord, place your first finger (index finger) on the first fret of the E string, and your second finger (middle) on the second fret of the G string (the one closest to your face). Strum each string one at a time – do they all ring out, or do any of them sound dull and clunky? If they’re dull, adjust your fingers to be sure they are pressing firmly on the string you want to press on and that they’re not accidentally bumping up against one of the strings that should be played open. Once all four strings sound good separately, strum them together to make the F chord.
Start with F chord. Strum four times. Switch to C and strum four times. Repeat that several times till it feels smoother.
A nice thing about C and F is they use different fingers. When playing F with your first and second finger, you can keep your third finger (ring) poised above the string, ready to press back down when it’s time to play the C. So, for the switch, you put the ring finger down and lift the other two slightly above the strings.
Let’s Play a Song!
Every time you see parentheses, you’ll strum. When you see (F), you’ll strum once on the F chord. If you just see the parentheses with no letter between them, that means you strum the last chord again – no change needed. So, in this notation, you’ll strum F, and then strum it again on the top line, then switch to C, strum once, strum F, strum C, strum F.
(F)The farmer in the dell, the () farmer in the dell, (C)Hi-ho, (F)the derry-o! (C)The farmer in the (F)dell.
Try playing that several times to see how it goes. Then try shifting your strumming pattern:
Then try singing different words to that same tune:
Then try this one:
(F) Oh my darling, () oh my darling, () oh my darling () Clemen(C)tine, () You were lost and gone for(F)ever dreadful (C) sorry Clemen(F)tine
And a classic:
The (F) wheels on the bus go () round and round, (C) Round and round, (F) round and round, The () wheels on the bus go () round and round (C) All through the (F) town.
Play that several times till it’s feeling good. There are many different children’s songs set to the tune of Wheels on the Bus, so that tune will take you far!
A brief note on keys: songs can be played in different keys, which means using different sets of chords. I have intentionally, to simplify things, clustered songs together that are easy to play on the C and F chord, even though there are other perfectly fine ways to play them. Here’s Wheels played on C and G chords (everywhere you were playing F, play C, everywhere you were playing G, play C), and on D and A.
To learn more kids’ songs that only use C and F, check out my Easy Children’s Songs on Ukulele song sheets. Here’s Itsy Bitsy Spider, Kookaburra, and Mary Had a Little Lamb.
Hurray! You’ve learned lots of songs using C and F!
First, you need a ukulele. I recommend a soprano or a concert ukulele (they are tuned to the same pitch, just the concert neck is a little longer which makes playing chords easier for folks with bigger fingers, and means that the instrument has a wider range of notes to play. The concert also has a more resonant, richer tone, because it’s a larger instrument, but I think soprano sounds fine for preschool songs.)
If you look on your local Facebook marketplace or other places used instruments are sold, you’ll find ukuleles in varying quality and price points. Or, ask your friends, maybe someone you know has a ukulele they’re not using. All you really need is a ukulele. You don’t need a strap or a case, though they’re nice to have.
If you’re buying new, it may be best to go to a local shop that sells guitars and ukes and has knowledgeable staff, where you can try things out hands-on. I have ordered mine online. My Kala KA-15S was a fine starter instrument, though with only 12 frets, it will have a limited range as your skills build. It’s currently $99 including a bag, strap and tuner. I think the Enya Carbon Fiber is a better bet. It’s only $49 (with bag and strap, no tuner) but has a really nice sound, has 17 frets, and I am much more convinced that it would survive being stepped on by a preschooler. (This hasn’t happened in my classes yet, but I am certain it will someday!) Those links are Amazon affiliate links, and I do get a referral fee if you click through and purchase something. You can also find lots more recommendations for beginner ukuleles.
In this video, I compare the Enya, described above, with my Kala KA-SCAC-SLNG, which is a long neck soprano, which cost $259.
Choose a Tuner and/or App
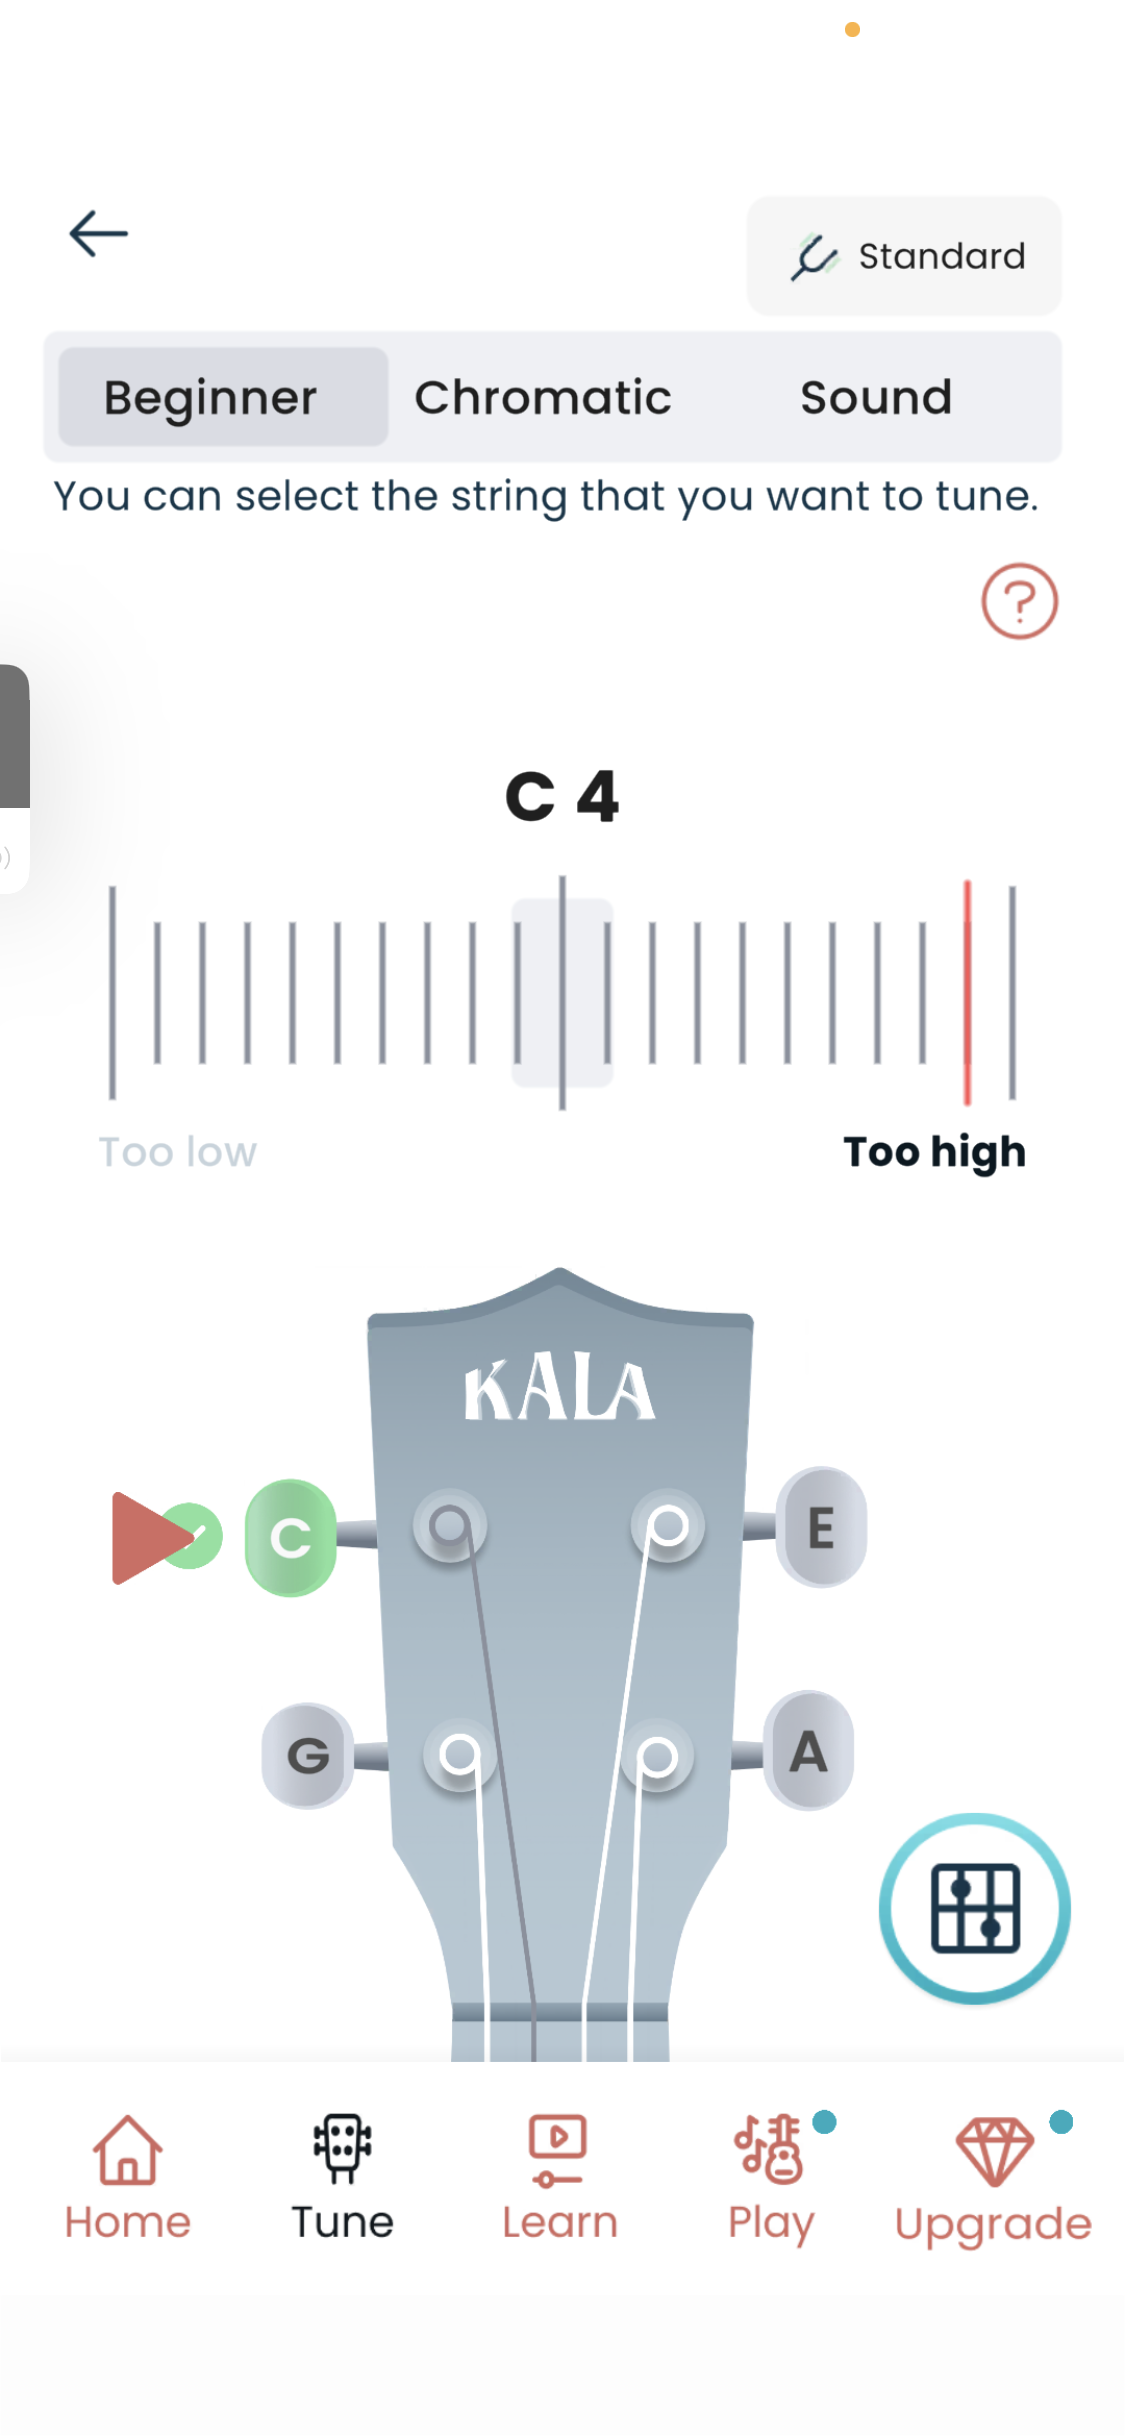
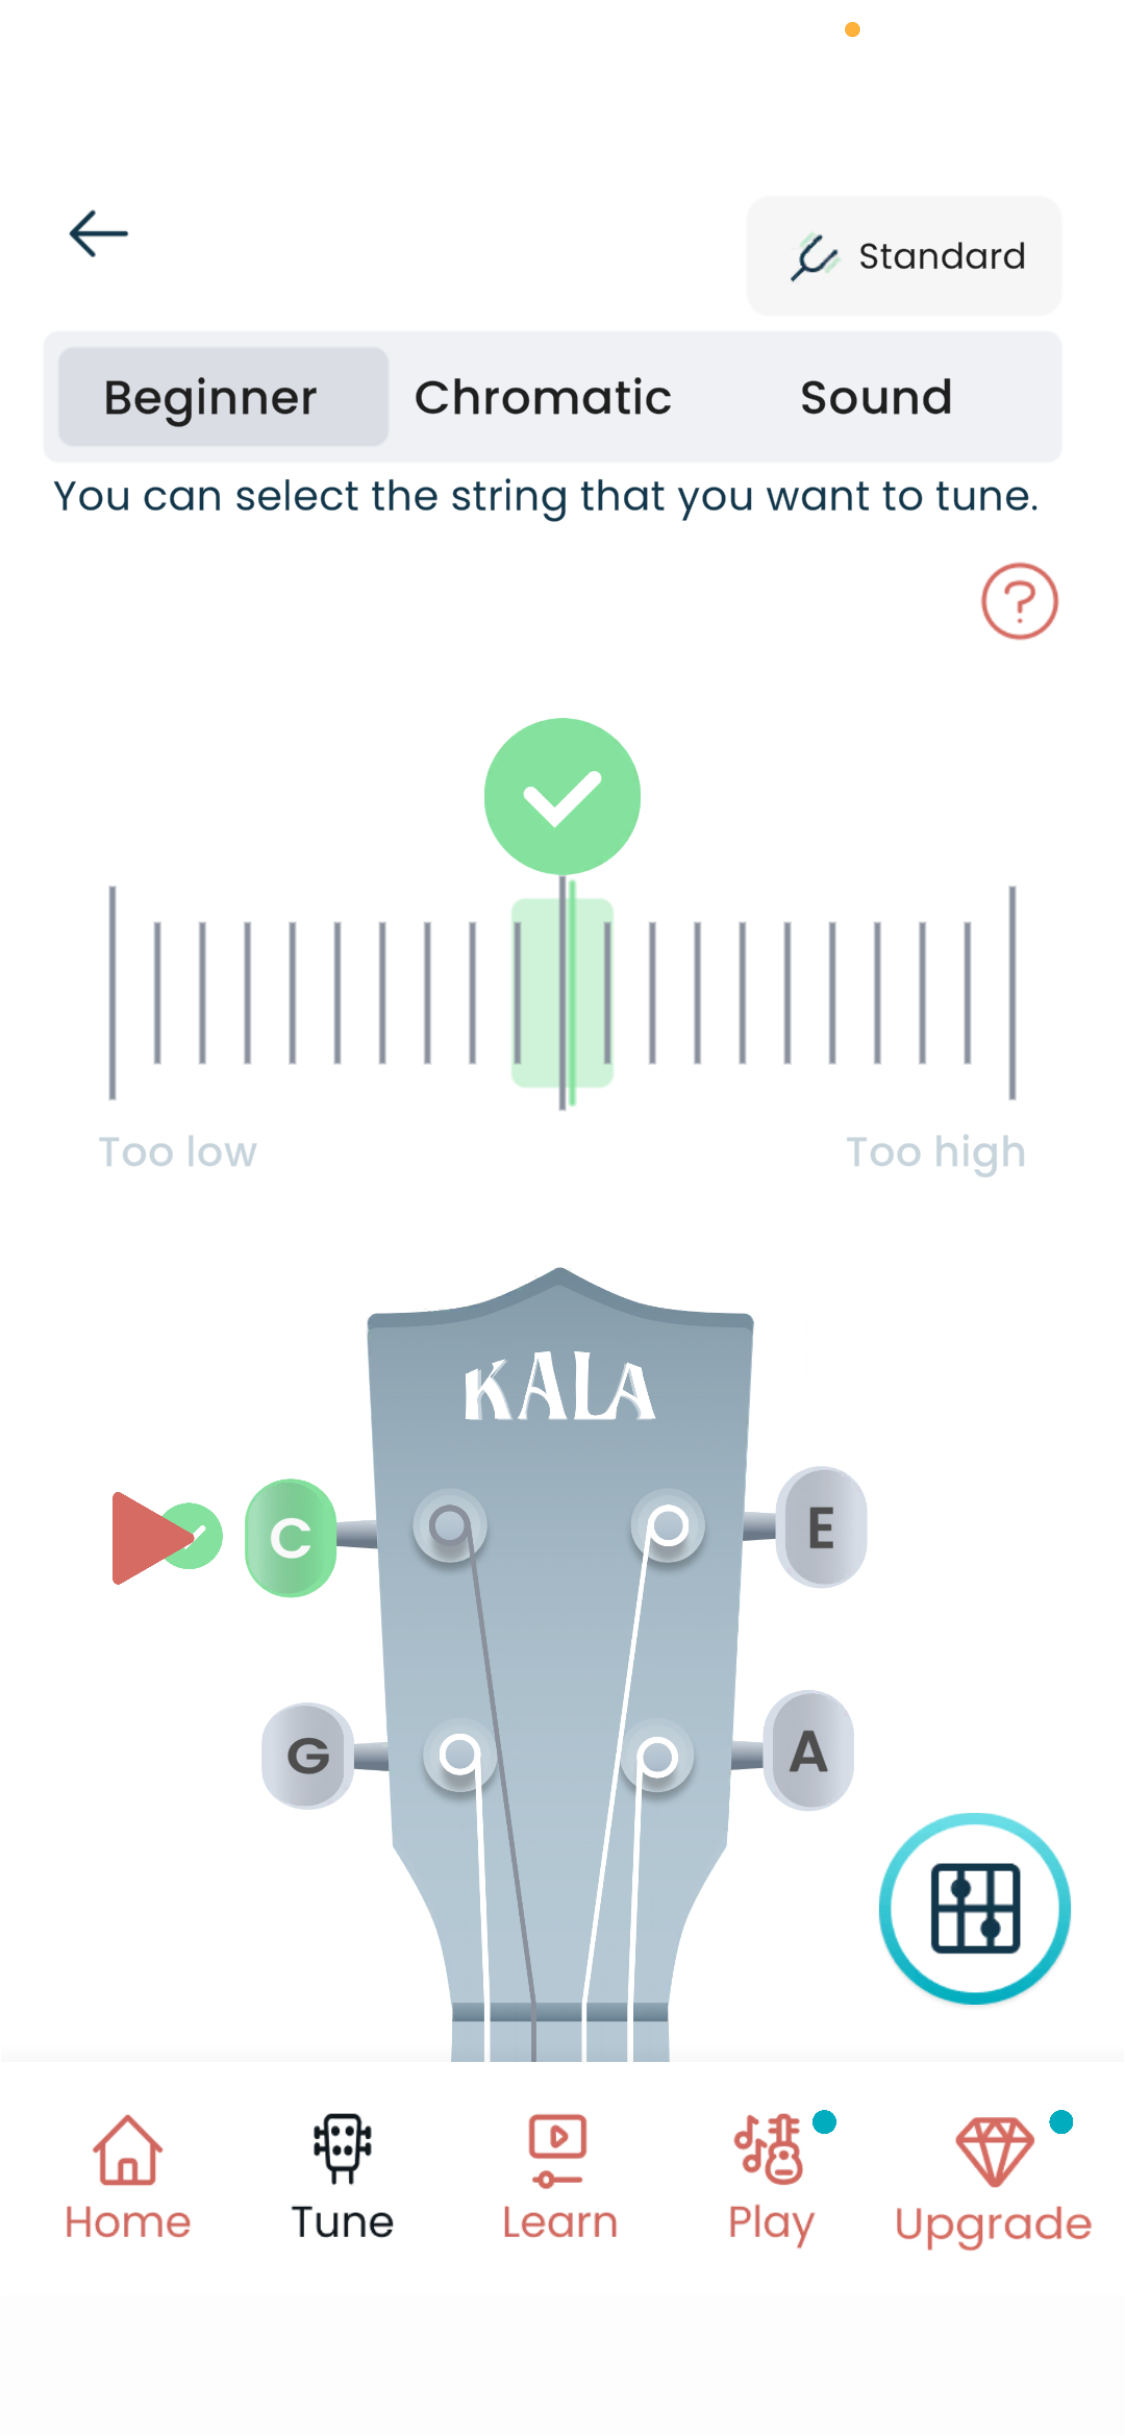
There are ukulele specific tuners and chromatic tuners. I like a chromatic tuner. A basic tuner just tells you whether you’re playing a G, C, E, or A since those are the chords on a uke. If you’re tuning for C and you’re not in the range for C, it doesn’t show anything. When you’re getting closer to C, it shows that you’re too high or too low. When you’re in tune, it shows that. Here’s two images from beginner tuner in the Kala app.
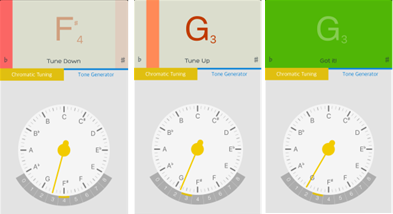
A chromatic tuner tells you what note you’re playing – like that your G string is currently playing F# – and clues you into whether you need to tune up or down to find the correct note. From the insTuner app:
You could buy a clip-on tuner, or one might come with your uke. They probably work better than an app in a loud setting (like say at a preschool after the kids arrive!)
I just use an app on my phone – if you buy a Kala uke, it will give you access to the Kala app, which includes a basic tuner and a chromatic tuner. The YouKeLiLi Tuner app is an OK tuner, but I like that it also offers chord diagrams, for when I need to look up how to play a C6 chord or F#m. The main tuner I’m using now is insTuner, which is an easy to use chromatic tuner. Here’s a very brief video of Instuner in action.
Note: There are several apps which also have video lessons to help you learn ukulele: including the Kala app, the OK Music app. I haven’t used them much, but they’re probably worth checking out while you’re looking at apps.
Learn How to Tune
When you get a new ukulele, it is likely to be out of tune! If it’s a used uke, they do go out of tune over time. New ukes are shipped with the strings loose to avoid damage, and so you have to tune them up when you get them, and keep tuning them a lot in the first few weeks as those new strings stretch out and settle in.
When you’re holding a ukulele with the neck in your left hand, the top string is a G, the next one down is a C, then E, and A is the one at the bottom. To tune, you play a note on the string, check the tuner, and turn the tuning pegs clockwise or counter-clockwise till it’s in tune. The easiest way to learn this is to watch a video! Here’s my favorite on How to Tune a new ukulele fresh out of the box by Bernadette, who is my favorite online ukulele teacher.
Since it sometimes helps to be taught the same skill in a few different ways till you find the one that clicks with your learning style, you may also check out: How to Tune from Katie from One Music School – shows at the beginning how a tuning app works. https://youtu.be/2hZY_WzaS78?t=36; and How to Tune by Andy Guitar – easiest to see tuner as he tunes https://youtu.be/2VOuRBjmzAM?t=45
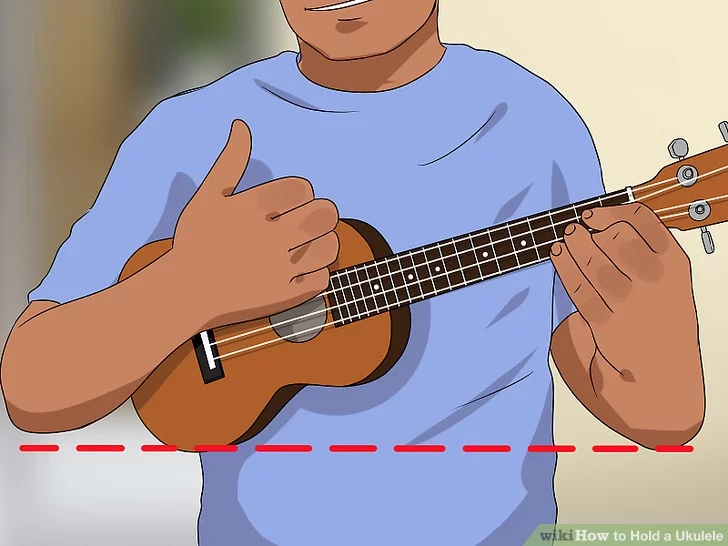
Learn How to Hold Your Uke
There are some written tutorials online, some with helpful diagrams, such as Zing instruments and the Wikihow.
Some key points: hold it so the back of the ukulele is pressed against your belly or chest, and your right forearm is braced against it to hold it in place. The neck is in your left hand – it rests in the space between your thumb and first finger – your thumb is on the back or top of the neck, your fingers are cupped, ready to make chord shapes on the fret board.
For your first few strums, let’s try strumming with your thumb. Stick your thumb up like you’re giving someone a thumbs up, then brush it across the strings like you’re brushing a hair off the strings with the side of your thumb. Here’s a video that clearly illustrates this: [note: all my video links are set to go to a specific point in a video, like this one starts at 3:04. That is the most relevant spot in this video, and then I recommend that you watch it up till 5:18. There’s lots of other good stuff in this video, but that’s the section to focus on for now.]
This is just a beginning strum technique – it works best when you just want to strum down once at the beginning of each bar of music. You’ll quickly move on from it to the next one, which is a lot more versatile, especially when we add in down-up strum patterns.
Learn to Strum with Your Index Finger
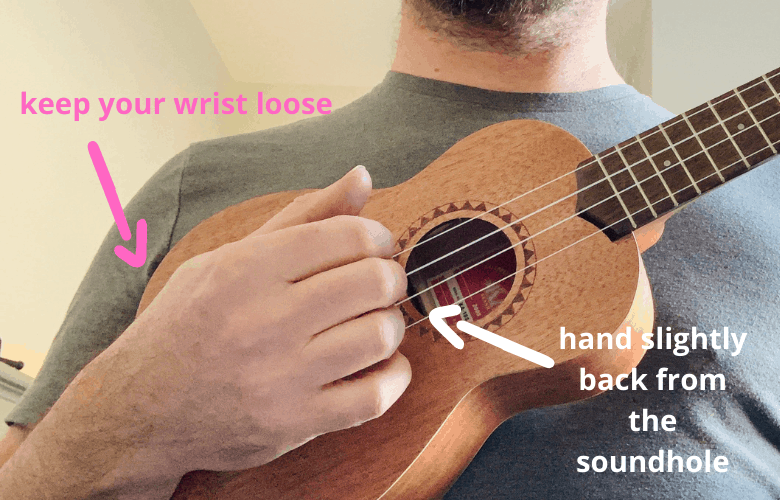
You can strum with just your index finger, or you can place your thumb against your index finger to give it more strength (and make your strums louder.) Some people use a pick for ukulele, but most do not. This video starts at 3:02 – watch to 5:07 to get the strumming technique.
Again, if you need more tips to help you find the way that works best for you, check out these three takes on strumming, from my video, which covers thumb and index finger strums, from Bernadette – https://youtu.be/VJZg_vxODOY?t=30 and from Phil Doleman – https://youtu.be/CTWCmCKggwg?t=442 – watch to 9:20.
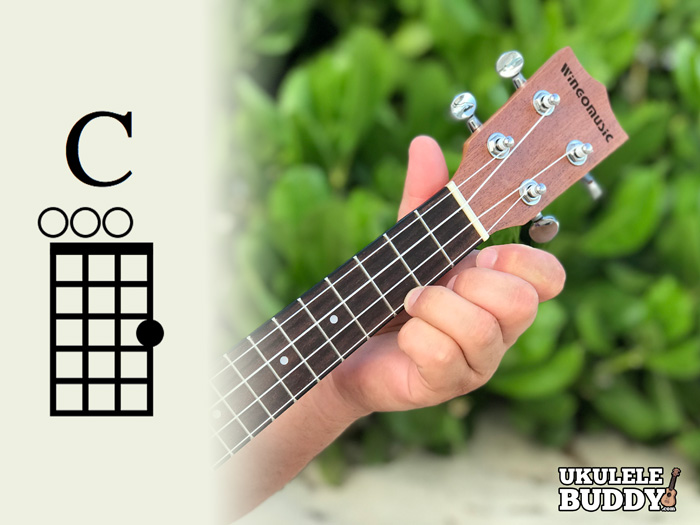
Learn How to Play a Chord
Let’s start with the C chord. You only need to use one finger to make this chord. Just press the tip of your ring finger down on the neck of the uke, in the third fret (the space between the second and third fret markers – learn more about your fret board). First, just strum that one string (the A string, the one lowest down when you’re holding the ukelele.) Does it ring out nicely? Or is there a dull plunking sound? If it’s dull, you’ll need to press down harder, and be sure you’re pressing beteen the fret markers. Getting good pressure on the string can be tricky if your fingernails are long – that’s why most guitar and uke players have short fingernails on their left hand!
Once that note (the C note played on the A string) sounds good, strum all four strings together to make the C chord.
This video walks you slowly through how to play Row Your Boat using just a C chord. She shows you how to play it with just one strum per bar, and then gradually, playing it as half notes, quarter notes and eighth notes.
I’m creating a series for people who teach babies, toddlers and preschoolers and for children’s librarians about learning how to play ukulele to supplement their storytimes and group times with live music.
But I know that many of those professionals might think “but I’m not a musician! I can’t do that. I just don’t have that talent.” Sounds like fixed mindset, eh?
Let me tell you my story of how I got past that block, in hopes of inspiring you to do the same.
When I was young, I thought I was a bad singer. Because way back in fourth grade, my teacher told me I didn’t sing well enough to do a solo. So I spent years not singing solo in public (though I would join in to camp songs or hymns at church as long as plenty of other people were singing.) But, when I started teaching parent-child programs 30 years ago, I truly believed that babies benefit when parents sing to them, so I confronted the fact that part of my job was to teach the parents to sing to their babies. I had to get past my anxiety about my voice and sing out boldly – and I did it… for the sake of the babies!
But, despite that accomplishment, I still believed that I would never play an instrument well.
Because way back when I tried to learn an instrument (piano at age 5, recorder at 10, guitar at 13), I wasn’t good at it yet. I was used to getting good at things quickly, and playing an instrument just didn’t work that way. And I just didn’t have the patience or attention span to follow the recommended method of playing the same song again and again and again till I got good. In eighth grade, my teacher told me that I was incompetent at tuning a guitar. I let those judgments settle me into a fixed mindset that “some people have the talent to be a musician, and some don’t. I don’t have the talent.”
But, a couple years ago, I gave myself the ukulele challenge – I decided to apply the growth based mindset to learning an instrument. Anyone can get good at anything – they just have to work hard at it, and persist through challenges, and focus more on process and progress than on product.
It turns out that learning an instrument as an adult is much easier! I’m better at learning now than I was then, and better at motivating myself. And while as a 13 year old, I didn’t want to “play baby songs” as I learned, when I learned as an adult, who happens to teach preschool, it turns out that playing baby songs was exactly my goal! And I still don’t like practicing the same song again and again, but as a grown-up, I decided I don’t have to follow rules about how you should learn. I skip from song to song to song whenever I want to, and my skills just build across the board over time.
I started by learning just a few chords, and then finding children’s songs I could play using those chords. Once I felt confident enough to try it, I would play one song on my ukulele at each week’s class. Over time, I added in a few more here and there.
Now, I have a large collection of songs I can play. I haven’t tried to memorize them all – I have always had notes in front of me anyways when I teach circle time to help keep me focused, so it was easy to just incorporate the chords into my notes and play along. Live music is now a part of every group time I lead.
And ukulele has become so much more for me than something I do for work. Each morning after I put my son on the bus to school, I spend 30 minutes playing ukulele – building my skills, expanding my repertoire. Rather than feeling like a chore, it feels like self care – “me time.” Most Sundays, I go to a ukulele group that meets in the park where a group of about 20 of us find joy in playing songs together for a few hours. I have led camp singalongs, and led services at my church.
Rather than having a view of a specific “product”, I have approached this whole thing as a process, and focused on progress. It’s so exciting when I reach new levels: each time I master a new chord, when I learned what it meant to play in the key of C versus the key of G, when I learned about the circle of 5ths and how to transpose, when I learned different strums, and then finger picking, when I learned to play by ear. It is so exciting to me, and amazing to me that I have reached the point where I can pick up any chord chart and play the song; I can look at melody lines on sheet music or at ukulele tabalatures, and quickly pick out any simple melody. It’s just something I could not have imagined a couple of years ago. But I got there!